Table of Contents
- What Is Soft Washing and Why It Works
- Soft Washing vs Pressure Washing: Key Differences
- Equipment and Supplies You’ll Need to Soft Wash a House
- Best Soft Wash Chemicals for House Siding
- Step-by-Step: The Best Way to Soft Wash a House
- How to Remove Mildew from Siding Effectively
- Safety, Runoff, and Common Mistakes to Avoid
- DIY vs. Professional Soft Washing: What to Consider
- Frequently Asked Questions
Last Updated: September 9, 2026
What Is Soft Washing and Why It Works
Soft washing is a low-pressure cleaning method that uses specialized biodegradable chemicals to eliminate organic growth like mold, mildew, and algae from exterior surfaces. Instead of relying on high-pressure water to blast away stains, soft washing uses a sodium hypochlorite solution combined with a surfactant to kill contaminants at the root. This approach consistently delivers longer-lasting results than abrasive cleaning.
Pressure alone can remove surface-level grime, but it often leaves behind the roots of mold and algae, which regrow within weeks. A properly applied chemical treatment penetrates the surface, killing the organic matter so it stays gone for months. For homeowners in humid climates, this distinction matters significantly.
Soft Washing vs Pressure Washing: Key Differences
The core difference between soft washing and pressure washing is the delivery method and the cleaning agent. Pressure washing relies on high-pressure water, typically 1,500 to 3,000 psi, to physically dislodge dirt. Soft washing uses low pressure, often below 500 psi, combined with cleaning solutions to dissolve organic growth without force.
Most guides treat these as interchangeable, which is a mistake. Here is how they actually compare:
| Factor | Soft Washing | Pressure Washing |
|---|---|---|
| Water pressure | Low (under 500 psi) | High (1,500+ psi) |
| Cleaning agent | Bleach-based solution | Water only or mild detergent |
| Best surfaces | Siding, roofs, painted trim | Concrete, brick, driveways |
| Primary target | Mold, mildew, algae | Dirt, grime, gum, oil stains |
| Risk of surface damage | Minimal | High on delicate materials |
| Results longevity | Months | Weeks |
Hard surfaces like driveways and sidewalks handle pressure well. Delicate surfaces like vinyl siding, roof shingles, and painted wood can be etched, cracked, or stripped by high pressure. Using a pressure washer on these materials is one of the fastest ways to cause expensive damage.
Equipment and Supplies You’ll Need to Soft Wash a House
A standard pressure washer alone is not sufficient because it cannot apply chemicals at the correct dilution or low pressure.
The essential equipment list includes:
- A pressure washer with adjustable pressure settings or a dedicated soft wash system
- A downstream injector or a 12-volt pump to draw and mix the chemical solution
- A low-pressure spray nozzle, often called a shooter tip, for applying the solution
- Chemical-resistant hoses and fittings
- Personal protective equipment including safety glasses, gloves, and rubber boots
You will need sodium hypochlorite, which is the active ingredient in household bleach but at a higher concentration, a surfactant to help the solution cling to vertical surfaces, and water to dilute the mixture. Many professionals also use a salt-based cleaner or specialized blends for particular surface types.
Best Soft Wash Chemicals for House Siding
The real test is matching the chemistry and technique to the specific material you’re cleaning. Here’s the surface-by-surface breakdown that most guides skip.
Vinyl Siding
Vinyl is the most forgiving surface for soft washing, but it has a hidden weakness: the chalky oxidation layer that forms as it ages. A standard 1.5% to 2% sodium hypochlorite solution with a surfactant will remove organic growth, but it won’t restore faded color. For that, you need a dedicated vinyl restoration product that contains hydrofluoric acid, which chemically removes the oxidized layer. Use this only after the bleach wash has killed the mold, and never mix the two acids together.
Streaking from the bottom edge of each panel happens when the solution runs behind the panel via capillary action and pulls dirt out from underneath. To prevent this, apply the solution from the bottom up, and use a fan nozzle rather than a pinpoint stream to avoid forcing water behind the seams.
Stucco and Fiber-Cement
Stucco is porous and highly alkaline, which makes it chemically reactive with bleach. A solution stronger than 1% sodium hypochlorite can cause efflorescence, a white, chalky residue that is nearly impossible to rinse off. For stucco, use a 1% solution and add a phosphate-free detergent to help lift the organic matter without attacking the surface. Keep the pressure below 300 psi, as stucco’s finish coat is fragile and easily pitted.
Fiber-cement siding (like HardiePlank) is more forgiving than stucco but still requires a gentle hand. A 1.5% to 2% solution is safe, but the critical step is rinsing thoroughly. Fiber-cement is porous, and residual bleach can wick into the material and cause long-term discoloration. Rinse from the top down, and make two passes to ensure all chemical residue is flushed from the surface.
Painted Wood
Painted wood is the highest-risk surface for soft washing. Bleach is a paint stripper at high concentrations, and even at low concentrations it can soften aged paint. For painted wood, drop the concentration to 1% and add a surfactant designed for paint-safe cleaning. Test an inconspicuous area first, and watch for paint bubbling within 5 minutes. If the paint softens, you have two options: reduce the concentration further or switch to a sodium percarbonate-based cleaner (oxygen bleach), which is less aggressive on paint but still kills mold.
Aluminum Siding
Aluminum is non-porous and resists mold growth, but it corrodes when exposed to bleach for extended periods. Use a 1% solution and keep the dwell time to the minimum needed, 5 minutes or less. Rinse immediately and thoroughly. If you see pitting or white oxidation after rinsing, you left the solution on too long.
The Surfactant Matters More Than the Bleach
Plain bleach has low viscosity and runs off vertical surfaces in seconds, giving it almost no dwell time. A surfactant, like a laundry detergent or a commercial product such as Sodium Lauryl Sulfate, reduces the surface tension of the water, allowing the solution to cling to the siding in a thin, even film. This film is what keeps the bleach in contact with the mold long enough to kill it. Without a surfactant, you’ll use twice the bleach and get half the results.
Never mix sodium hypochlorite with any acid-based cleaner (including the vinyl restoration products mentioned above). The combination produces chlorine gas, which is toxic and potentially fatal. Always rinse the surface thoroughly between different chemical applications.
Matching Concentration to Growth Severity
For light mildew, 1% is sufficient. For heavy, years-old mold growth, 2% to 3% is appropriate. But the concentration is only half the equation, the dwell time does the killing. A 1% solution left on for 15 minutes outperforms a 3% solution rinsed off after 3 minutes, and it’s far less likely to damage the surface or surrounding plants.
Step-by-Step: The Best Way to Soft Wash a House
The best way to soft wash a house follows a consistent sequence: prep, apply, dwell, and rinse. Skipping any of these steps reduces effectiveness and can lead to unsatisfactory results or surface damage.
Step 1: Prep the Area and Protect Landscaping
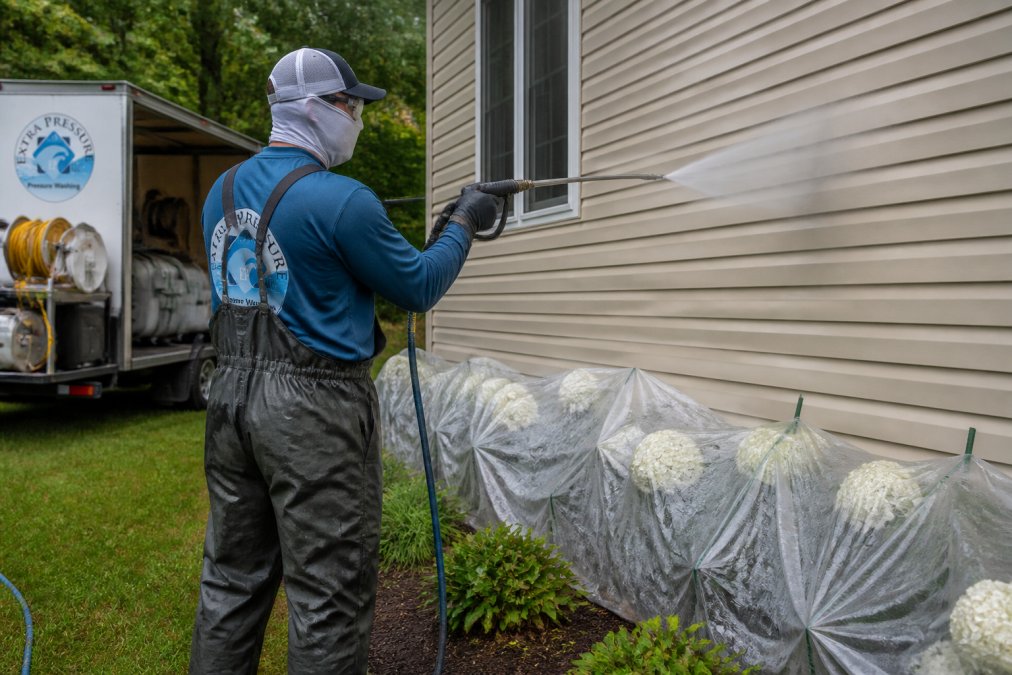
Before any chemical touches the siding, protect everything around the house. Cover delicate plants and shrubs with plastic sheeting or drop cloths. Wet the landscaping thoroughly with plain water before and after the application, as this dilutes any chemical that drips onto the soil. Move furniture, grills, and decorations away from the work area. Close all windows and doors, and disconnect any outdoor electrical fixtures that could be exposed to water.
Step 2: Apply the Cleaning Solution
Mix your sodium hypochlorite solution to the appropriate dilution for your siding type, and add the surfactant. Using the low-pressure nozzle, apply the solution from the bottom up. This bottom-up approach prevents the chemical from streaking down already-cleaned sections. Work in manageable sections so the solution does not dry before you rinse it. Keep the spray pattern even and avoid saturating any single area.
Step 3: Dwell Time and Rinsing
The dwell time is the period the solution sits on the surface to break down the organic growth. Most applications require 5 to 15 minutes of dwell time, depending on the severity of the mold or mildew. The surface should remain visibly wet during this period. If it dries out, the chemicals lose effectiveness and can leave residue. After the dwell time, rinse the surface thoroughly with plain water, again using low pressure to avoid forcing water behind the siding.
How to Remove Mildew from Siding Effectively
Mildew roots penetrate the surface, so a simple rinse will not prevent regrowth. The most effective method to remove mildew from siding is to apply a bleach-based soft wash solution, allow adequate dwell time, and rinse clean.
If the mildew has been present for years, the first wash will kill it, but the staining may take several days to fully fade as the dead organic matter breaks down. Reapplying chemicals too aggressively can damage the siding.
Safety, Runoff, and Common Mistakes to Avoid
Always wear protective gear including safety glasses, chemical-resistant gloves, and long sleeves. Avoid working on windy days when the spray can drift onto you or your landscaping. Never mix sodium hypochlorite with other cleaners, particularly ammonia-based products, as this creates toxic fumes.
Water runoff management is an area most DIY guides overlook. The chemical solution that rinses off your house flows into your yard and eventually into storm drains. While soft wash solutions are biodegradable at proper dilution, concentrated runoff can harm grass, plants, and local waterways. Containing runoff where possible and diluting it with fresh water after rinsing minimizes environmental impact. The Environmental Protection Agency’s guidance on stormwater runoff offers practical steps for managing wash water responsibly.
Common mistakes include using too much pressure, applying chemicals on hot surfaces where they evaporate too quickly, and failing to pre-wet landscaping.
DIY vs. Professional Soft Washing: What to Consider
The cost and risk calculations are rarely laid out clearly. Here’s the breakdown that most guides skip.
The Real Cost of DIY
If you own a pressure washer already, you’re halfway there. But you still need the soft wash-specific gear. A downstream injector costs between $25 and $60 and attaches to your existing pressure washer. A 12-volt soft wash pump system runs $150 to $400 if you want a dedicated setup. Chemicals add another $30 to $60 per wash: a gallon of 10% sodium hypochlorite runs about $10 to $15 at a pool supply store, and a gallon of surfactant costs $15 to $25.
Renting is the cheaper entry point. Most big-box home improvement stores rent pressure washers for $80 to $120 per day. Add the injector and chemicals, and you’re looking at $150 to $200 for a full day, enough time to wash an average single-story home if you’ve done it before.
A full house wash takes 4 to 6 hours for a first-timer, plus another hour of prep and cleanup. If you make a mistake, too strong a solution on painted wood, or forcing water behind siding, the repair cost can exceed what a professional would have charged.
What Professional Soft Washing Costs
Professional soft washing typically runs $0.30 to $0.70 per square foot of living space. For a 2,000-square-foot home, that’s $600 to $1,400. The wide range reflects surface type (vinyl is cheaper, stucco and wood are more expensive), the severity of the growth, and your region. Most companies have a minimum service fee of $250 to $350, which covers the mobilization cost.
The Risk-Adjusted Comparison
The real question is which is cheaper when you factor in the cost of mistakes. Consider these scenarios:
- You have vinyl siding and a pressure washer already. DIY is a reasonable choice. The learning curve is manageable, and the materials are forgiving. Expect to spend $100 to $150 on supplies and a weekend afternoon.
- You have painted wood or stucco. The risk of damage is significantly higher. A single mistake, using a 3% solution on painted wood or applying too much pressure to stucco, can cause $500 to $2,000 in repairs. Professional washing at $600 to $900 starts to look like a bargain.
- You have a two-story home. Ladder work with a spray wand is where most DIY injuries happen. Professionals use extension wands and, in some cases, aerial lifts. The safety risk alone justifies the professional cost for multi-story homes.
- You’re preparing to sell. Professional washing includes a level of thoroughness, cleaning gutters, window frames, and trim, that most DIY efforts miss. Real estate agents consistently report that exterior cleanliness adds to perceived value, and the documentation of a professional wash can be a selling point.
The Maintenance Factor
If you have single-story vinyl siding and a weekend to spare, DIY is a viable option. If you have delicate surfaces, a multi-story home, or recurring mold problems that suggest an underlying moisture issue, the professional route is the lower-risk choice.
The Verdict
DIY soft washing is a legitimate weekend project for the right home. But the professional value proposition isn’t just the wash, it’s the surface assessment, the proper chemical selection, and the liability if something goes wrong. For most homeowners, the decision comes down to risk tolerance and time, not just the dollar difference.
Frequently Asked Questions
What is a good solution to soft wash a house?
A standard soft wash solution combines sodium hypochlorite (bleach), water, and a surfactant to help the mixture cling to the surface. For most house siding, a bleach dilution of 1-2% is effective for killing mold and mildew. Adding a surfactant helps the solution adhere to vertical surfaces longer, which is crucial for dwell time. Always follow the chemical manufacturer’s safety instructions.
Is soft washing better than pressure washing for siding?
Yes, for most house siding, soft washing is the safer and often more effective option. Soft washing uses low pressure (typically under 500 psi) combined with cleaning chemicals to kill organic growth at the root, while pressure washing relies on high-pressure water that can damage siding, force water behind seams, or strip paint. Professionals use soft washing to clean delicate surfaces like vinyl, wood, and stucco without causing surface damage.
How often should a house be soft washed?
Most homes in humid climates benefit from a soft wash every 12 to 18 months to prevent mold, mildew, and algae from reestablishing. The frequency depends on your local environment; homes near trees or in shaded areas may need annual cleaning. Regular exterior maintenance not only keeps your siding looking fresh but also prevents organic growth from causing long-term damage to paint and materials.
Can I soft wash my house myself?
You can, but it requires careful handling of chemicals and the right equipment. DIY soft washing involves risks like mixing chemicals incorrectly, damaging plants with runoff, or injuring yourself from ladder work. Professionals use downstream injectors and calibrated dilution ratios to apply the solution safely. For a one-story home with easy access, DIY is possible, but for multi-story homes or extensive mold, hiring a licensed, insured service is often safer and more effective.
Leave a Reply